Annmarie's Gluten Free Birthday Cannoli
Annmarie just had her birthday and her big request this year was for cannoli. Ever since she was diagnosed with celiac she's had to opt out of her family's traditional Christmas cannoli and she's been missing them ever since. I guess she felt that we have come a long enough way in GF baking to finally try to make GF cannoli.
We looked and looked online but couldn't find a recipe for GF cannoli. We found several people asking if anyone had a GF cannoli recipe, one person saying she found one in Italian, and a few others suggesting to use GF pizzelle instead of a cannoli shell to make "cannoli" (to which Annmarie scoffed). You know, when you are trying to re-create a family tradition you have to do it right, so she sent for her father's glutinous recipe and we prepared to experiment with flours until we found something that worked.
Her father, it turns out, is the cannoli maker in the family. When I was quizzing her on how these shells are made (I'd only had two cannoli in my lifetime, so I was kind of operating in the dark) Annmarie told me, "well, my dad would disappear into the basement and when he came upstairs he had cannoli!"
Sigh. I guess we were both operating in the dark, but at least she knew what they were supposed to look, taste and feel like.
January 30, 2009
Name of Cannoli: Annmarie's Great-grandmother Martino's Cannoli, GF Style
Occasion: Annmarie's Birthday!
Constituents: GF Cannoli shells filled with cannoli filling (sweetened ricotta with optional add ins)
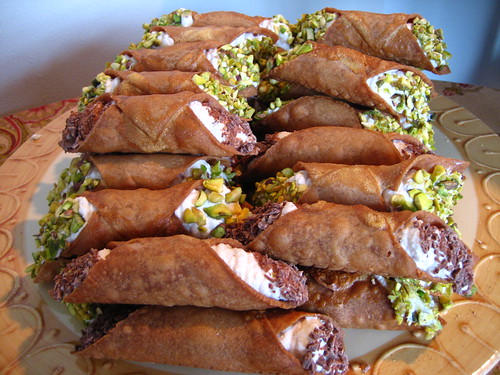
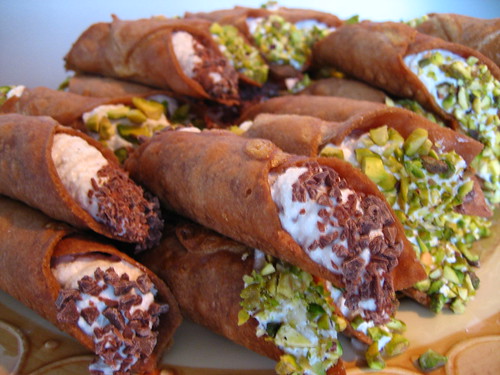
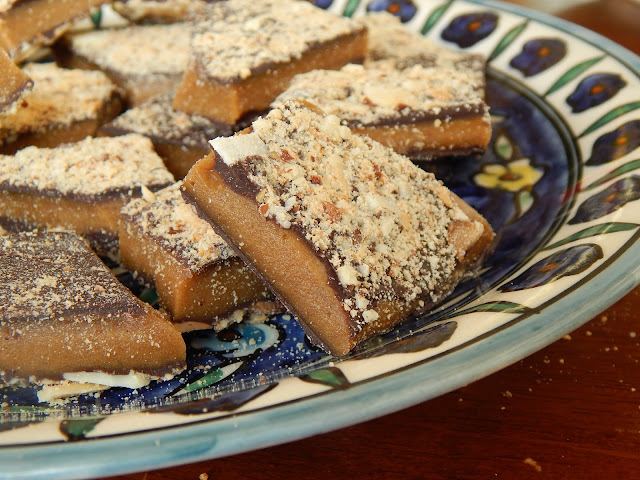
For those of you not in the know, cannoli is an Italian dessert (by way of Sicily) made by deep frying a square of pastry that's been wrapped around a metal tube to make a crispy shell. The middle is stuffed with sweetened ricotta cheese mixed with a variety of foods like chopped chocolate, chopped pineapple, citron, candied cherries, and nuts. The ends of the cannoli are usually covered in either chocolate, chopped pistacios, or other chopped and possibly dyed nuts. If you like your desserts on the creamy side, you will like these.
(By the way, cannoli is the plural of canolo; thanks Wikipedia!)
Cannoli dough, at least Great-grandma Martino's, is basically a modifed pastry dough. You kind of cut a few tablespoons of shortening into some flour, cinnamon and salt, and add enough wine and water to have it all come together. You then knead the dough until it becomes a big sticky elastic mass and refrigerate for a bit to relax the gluten. Then you roll out the dough, cut out some squares, and roll them 'round a cannoli tube. This gets deep fried until it is golden and blistered, then you let the shells cool down enough to pull them off the tubes so you can use them for the next round of frying.
For gluten-free cannoli shells, we made a few moderations to this method: First off, without gluten we weren't going to get an elastic dough so we didn't worry about over kneading or over mixing or over rolling. Next, we found it was much easier to tear off bits of the dough, roll them into balls about 1.5 inches in diameter, and roll each of those out with a rolling pin between two sheets of plastic wrap.
The plastic wrap method is really important, as the dough is a bit sticky and prone to tearing. Annmarie found that the thinner she rolled out the dough, the more authentic they would look and taste. I think she settled on a thickness of about 1/8 inch.
She then cut the dough into a rough square, and used the plastic wrap to roll the dough onto the tube. If she didn't use the plastic wrap to support the dough, it had a tendency to fall apart and be all sorts of difficult.
The two corners of the dough that overlap are sealed with a little bit of beaten egg yolk, and then dunked in the hot oil.

My mom gave me a little deep fryer this year for Christmas (emphasis on little), so we fried two cannoli at a time. We also only bought four cannoli tubes (they were $2.50 each!) so this gave us a nice little rhythm of frying two while rolling out two.
The key to good cannoli filling is to find the best ricotta that is thick, not runny. Even so, the ricotta must be left to drain in a cheesecloth-lined strainer for an hour or so at room temperature. Once the cannoli shells are filled they will begin to loose their crunch, so it is important to stave off that process as much as you can by making sure the filling is a dry as possible. To the ricotta, we added cinnamon, chopped chocolate, powdered sugar (important as the cornstarch will sop up any liquid), and chopped, drained pineapple. Her dad did not specify any amounts of these things, so we sweetened and cinnamoned to taste, used one chocolate bar, and one small can of pineapple.

Annmarie was excited as she observed the tell-tale blisters on our cannoli shells, and even more excited when she tasted one. It was crisp and (to me) tasted a lot like a sugar cone. We never had a problem with the dough falling apart as it was frying, and once we discovered the plastic wrap trick, the dough always rolled onto the tubes without fuss. When we filled a few cannoli she tasted one, and became even more excited. She declared them to be perfect! Awesome!
We flirted with the idea of quitting our day jobs and making GF cannoli for a living, but decided against it. But we are mighty proud of our achievement, and hope that all of the gluten-freers out there give these cannoli a try.
Tips for an enjoyable and tasty experience:
GF Cannoli: a flickr photoset
We looked and looked online but couldn't find a recipe for GF cannoli. We found several people asking if anyone had a GF cannoli recipe, one person saying she found one in Italian, and a few others suggesting to use GF pizzelle instead of a cannoli shell to make "cannoli" (to which Annmarie scoffed). You know, when you are trying to re-create a family tradition you have to do it right, so she sent for her father's glutinous recipe and we prepared to experiment with flours until we found something that worked.
Her father, it turns out, is the cannoli maker in the family. When I was quizzing her on how these shells are made (I'd only had two cannoli in my lifetime, so I was kind of operating in the dark) Annmarie told me, "well, my dad would disappear into the basement and when he came upstairs he had cannoli!"
Sigh. I guess we were both operating in the dark, but at least she knew what they were supposed to look, taste and feel like.
January 30, 2009
Name of Cannoli: Annmarie's Great-grandmother Martino's Cannoli, GF Style
Occasion: Annmarie's Birthday!
Constituents: GF Cannoli shells filled with cannoli filling (sweetened ricotta with optional add ins)
For those of you not in the know, cannoli is an Italian dessert (by way of Sicily) made by deep frying a square of pastry that's been wrapped around a metal tube to make a crispy shell. The middle is stuffed with sweetened ricotta cheese mixed with a variety of foods like chopped chocolate, chopped pineapple, citron, candied cherries, and nuts. The ends of the cannoli are usually covered in either chocolate, chopped pistacios, or other chopped and possibly dyed nuts. If you like your desserts on the creamy side, you will like these.
(By the way, cannoli is the plural of canolo; thanks Wikipedia!)
Cannoli dough, at least Great-grandma Martino's, is basically a modifed pastry dough. You kind of cut a few tablespoons of shortening into some flour, cinnamon and salt, and add enough wine and water to have it all come together. You then knead the dough until it becomes a big sticky elastic mass and refrigerate for a bit to relax the gluten. Then you roll out the dough, cut out some squares, and roll them 'round a cannoli tube. This gets deep fried until it is golden and blistered, then you let the shells cool down enough to pull them off the tubes so you can use them for the next round of frying.
For gluten-free cannoli shells, we made a few moderations to this method: First off, without gluten we weren't going to get an elastic dough so we didn't worry about over kneading or over mixing or over rolling. Next, we found it was much easier to tear off bits of the dough, roll them into balls about 1.5 inches in diameter, and roll each of those out with a rolling pin between two sheets of plastic wrap.
The plastic wrap method is really important, as the dough is a bit sticky and prone to tearing. Annmarie found that the thinner she rolled out the dough, the more authentic they would look and taste. I think she settled on a thickness of about 1/8 inch.
She then cut the dough into a rough square, and used the plastic wrap to roll the dough onto the tube. If she didn't use the plastic wrap to support the dough, it had a tendency to fall apart and be all sorts of difficult.
The two corners of the dough that overlap are sealed with a little bit of beaten egg yolk, and then dunked in the hot oil.
My mom gave me a little deep fryer this year for Christmas (emphasis on little), so we fried two cannoli at a time. We also only bought four cannoli tubes (they were $2.50 each!) so this gave us a nice little rhythm of frying two while rolling out two.
The key to good cannoli filling is to find the best ricotta that is thick, not runny. Even so, the ricotta must be left to drain in a cheesecloth-lined strainer for an hour or so at room temperature. Once the cannoli shells are filled they will begin to loose their crunch, so it is important to stave off that process as much as you can by making sure the filling is a dry as possible. To the ricotta, we added cinnamon, chopped chocolate, powdered sugar (important as the cornstarch will sop up any liquid), and chopped, drained pineapple. Her dad did not specify any amounts of these things, so we sweetened and cinnamoned to taste, used one chocolate bar, and one small can of pineapple.
Annmarie was excited as she observed the tell-tale blisters on our cannoli shells, and even more excited when she tasted one. It was crisp and (to me) tasted a lot like a sugar cone. We never had a problem with the dough falling apart as it was frying, and once we discovered the plastic wrap trick, the dough always rolled onto the tubes without fuss. When we filled a few cannoli she tasted one, and became even more excited. She declared them to be perfect! Awesome!
We flirted with the idea of quitting our day jobs and making GF cannoli for a living, but decided against it. But we are mighty proud of our achievement, and hope that all of the gluten-freers out there give these cannoli a try.
Annmarie's Great-grandmother Martino's Cannoli, GF Style
makes about 24-35 shells, depending on size2 cups fine-ground brown rice flour (we used Bob's Red Mill, which is still a bit gritty but you couldn't tell in the final product) 2/3 cup potato starch flour 1/3 cup tapioca flour 1/2 tsp xanthum gum 1 tsp ground cinnamon 1/4 tsp salt 1/4 cup sugar 3 tbsp shortening 1/2 cup port wine 1/4 cup + 2 tbsp water 1 egg yolk, beaten metal cannoli tubes 1-2 liters oil suitable for deep frying (we used canola oil and needed 1 liter for my little fryer) something to deep fry in--a deep pot or a deep fryer. You'll want it to be deep enough to have 5 inches of oil.
Whisk dry ingredients together in a medium bowl.
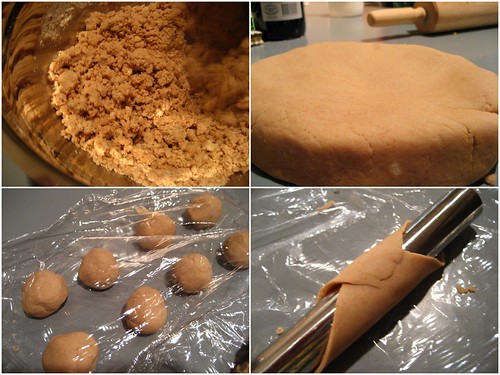
Add shortening, and add the liquid in 1/4 cup increments, mixing with a fork until dough starts to come together--it will look a lot like wet sand. We alternated liquids--for example 1/4 cup wine, then 1/4 water, then wine, etc. You may not have to add all the liquid.
Dump the wet sand-like dough onto a clean counter and knead for 15 minutes or until it comes together as a nice smooth ball of dough. It shouldn't be too sticky, but a little springy and a bit like fresh Play-Doh. Shape into a disk, wrap in plastic wrap and let rest in refrigerator for about 30 minutes.
You will want your oil at 350°F by the time you have a few shells shaped, so plan accordingly.
Shape approx 1.5 inch balls of dough; keep maybe six out at a time and leave the rest wrapped up in the refrigerator until needed. You don't want the dough to dry out. We even kept the few on the counter between plastic wrap too.
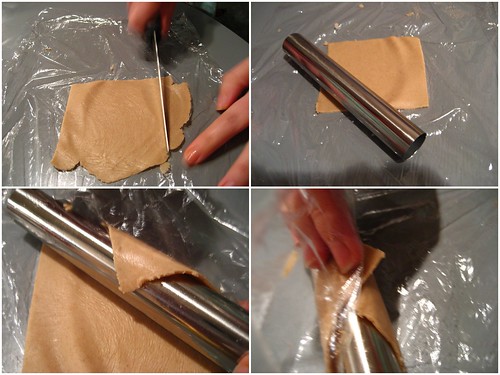
Between two small sheets of plastic wrap, roll out a ball of dough until it is about 1/8 inch thick. Cut off the sides to form roughly a 2 inch square, give or take 1/2 inch. Turn the square so that it looks like a diamond, with the point closest to you the bottom corner.
(The scraps can be re-used; we kept a pile of them to the side and re-rolled them into balls. This way you don't have any waste.)
Your goal is to wrap the dough around the tube so that the top and bottom corners meet at the top of the tube. Here's how to do it: peel off the top layer of plastic wrap and lay the cannoli tube across the bottom corner. Using the bottom layer of plastic wrap, roll the dough up and around the tube until the corner is at the top of the tube and the tube is laying from side corner to side corner. Peel back the bottom layer of plastic wrap; the dough should still be up on the tube. using the plastic wrap under the top corner, lift it up onto the tube and press the two corners of dough together. Dab a little beaten egg yolk on the seam to hold it together.
Fry dough on the tubes until crisp, golden brown, and blistered. Drain on paper towel until cool; remove tubes and re-use. Do NOT rinse tubes in water until you are completely finished frying shells.
Fill with cannoli filling and serve immediately, or wrap double airtight and let sit at room temperature for no more than 24 hours before using.
Annmarie's Great-grandmother Martino's Cannoli Filling3 lbs stiff ricotta cheese (imported Italian ricotta seems to be best)
You have lots of options for what you add to the ricotta; here's what we did:about 1 tsp vanilla extract one chocolate bar, chopped into little squares one can pineapple, drained and chopped powdered sugar, approx 3/4 to 1 cup about 1 tsp cinnamon
Drain the ricotta in a cheesecloth-lined strainer. It will go faster if the cheese is at room temperature. We let it drain for about 30-45 minutes per lb.
Once drained, place ricotta into medium bowl and stir in your add ons, to taste. We went for lightly sweet, but not forcefully so. Certainly less sweet than sweetened whipped cream.
Let cool in refrigerator for one hour; we let it cool overnight.
Fill a pastry bag with a number 6 round tip with the cheese mixture and fill shells. Alternatively, you can spoon it in but it takes a little longer. Dip the ends in chopped raw pistachio nuts, chopped chocolate, or what-have-you. You can sprinkle with powdered sugar right before serving if you like.
Tips for an enjoyable and tasty experience:
- It helps to have two people when making the shells. Annmarie rolled the dough and shaped the shells while I fried the dough and wrestled the finished shells off the tubes.
- This was no easy task, mostly because I wouldn't wait until the shells and tube were completely cool. The tubes were slippery from all the oil and I was worried about breaking the shells as I gripped and pushed and pulled. I finally discovered that twisting the shell while pulling the tube made the most progress--think of spiraling the shell off the tube.
- Be sure not to wrap the dough too tightly around the metal tube as it will make it even harder to get the shells off.
- If you are using a deep fryer, use the fry basket. When the shells are done, you can stand the shells on their end in the basket to let the excess oil drain back into the fryer before you put them on paper towel.
- What keeps food crisp while being deep fried is all the water in the food rushing out and pushing the oil back. That's what all the bubbles are. When the bubbles slow down, keep an eye on the shells as they are close to getting done. There is a fine line between a crisp and an oily shell, and it happens right when those bubbles slow down enough to let the oil soak in.
- The port wine is integral to the unique taste of these cannoli shells, but we found the taste the best when it was cut with a little water.
- The thinner you can roll the dough the faster it will fry, and the crisper it will be.
- The filling is really where you can get creative, but if you plan to use a pastry bag to fill the shells, make sure everything you add is chopped small enough to fit through the tip!
GF Cannoli: a flickr photoset

I love this post! Loved all the photos and how to do's. They look delicious too! I've never had a canolo. I must try one now.
ReplyDeleteHow wonderful Annmarie can have her family's traditional treat now when ever she wants it! Brilliant and Bravo! Happy Birthday Annmarie!
Thanks Melinda! I'm glad you liked the post--now go and try a canolo and let us know if you liked them, too :)
ReplyDeleteYUMMY those are my favorite. They look awesome
ReplyDeleteThanks Laurie! Have you made cannoli before?
ReplyDeletei had no idea how much work it would be.
Those look fantastic, ECL! What an undertaking! Your pics are making me hungry for a sweet...
ReplyDeleteAw thanks lady!
ReplyDeleteI can't wait to try the recipe.
ReplyDeletemy grandmother used to make a fried italian cookie the name when translated means little bracelets,after they were fried they were dipped in boiled honey.
Did anyone ever hear of these?
YES--Scalide. We have Annmarie's Great-grandmother's recipe for those, too. Just haven't tried to make them GF yet.
ReplyDeleteAs a fairly newly diagnosed celiac, I'm still struggling with the diet. I do okay until we go to Brooklyn, NY to visit my in-laws every couple of months. When I see my favorite pastry shop, I just want to cry, and I usually end up getting cannoli, and then getting so sick. This recipe means so much to me! Do you have one for GF Lobster Tails, or even just for the pastry dough? Those are my true favorite!
ReplyDeleteThank YOU and Annmarie for coming up with such great gluten free cannoli! Many of the GF Daring Bakers LOVED IT! I just may try it myself :)
ReplyDeleteWhat a great post! I'm so glad I found this. My mom has celiac and she mentiioned how sad she was when her workplace had a holiday tray full of different kinds of cannoli. I can't wait to surprise her for Christmas.
ReplyDeleteThank you so much for sharing!